DYNAMIC DRAINAGE DESIGN

Ditch and tile design for farmers and contractors

Ditch and tile plans from public LiDAR, straight to the machine

See where the water sits, lay out the ditches and tile, check every run against your limits, send the lines to your machine or drainage controller.
Download Dynamic Drainage DesignComing soonSee a design What's new · v1.4.0
  • Runs on your own Windows PC
  • Public LiDAR, no survey to start
  • Your fields and plans stay on your computer
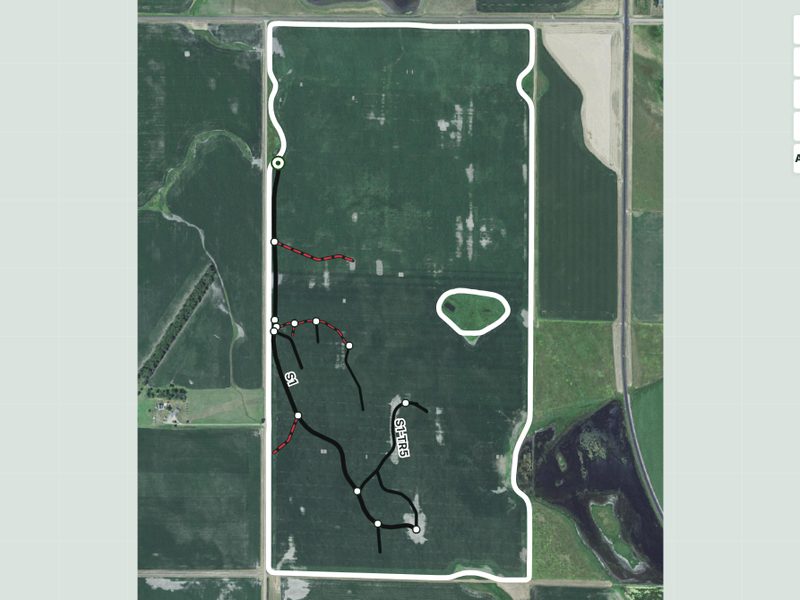
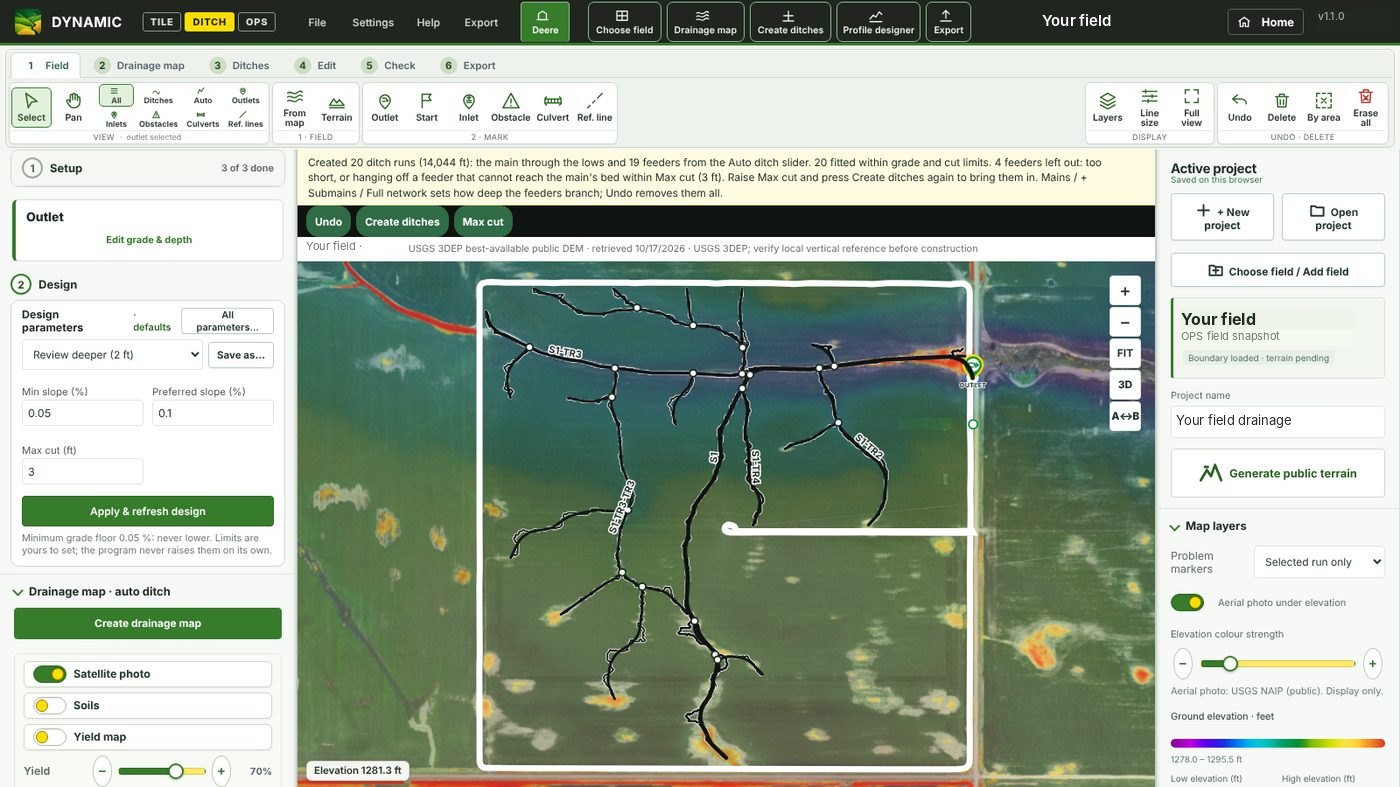
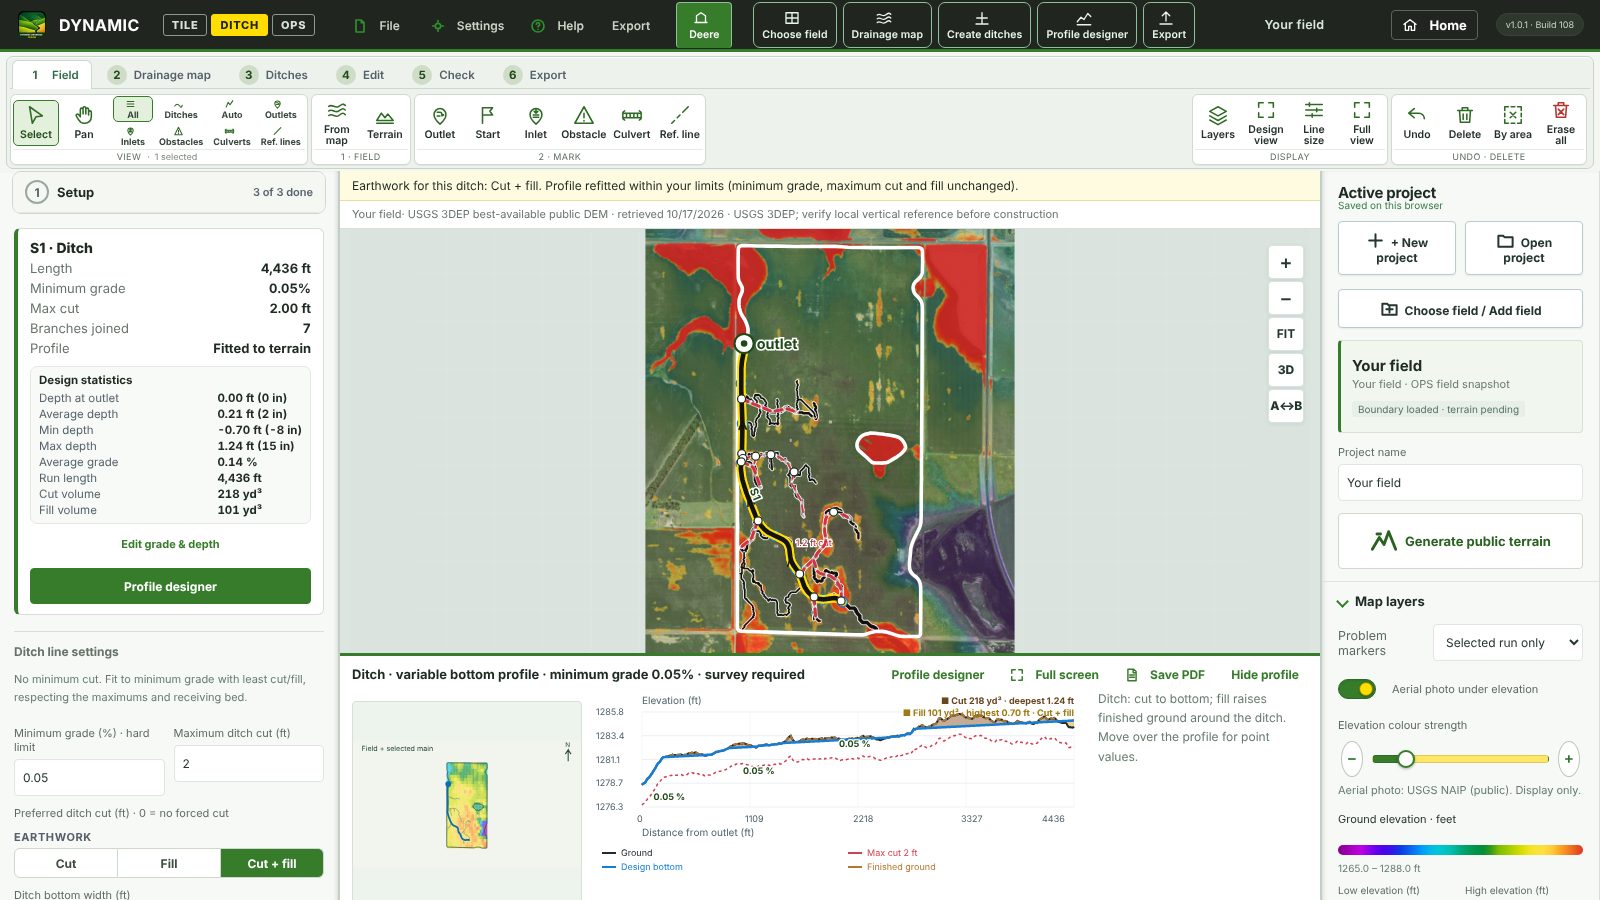
Design view: the aerial photo, the field line and a finished ditch network
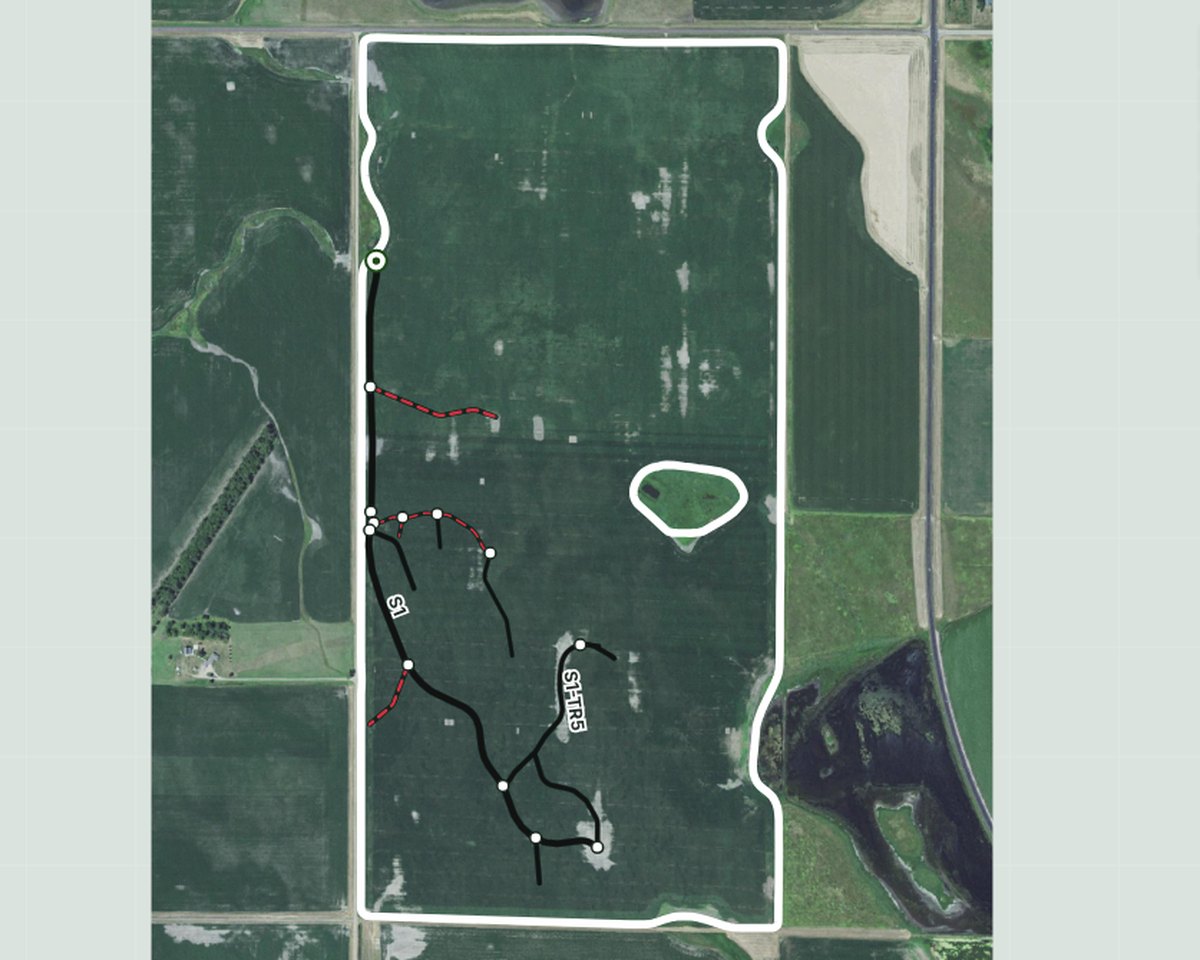
The finished ditch plan on the photo: one main and its feeders to the marked outlet, every run fitted to your limits. Real screen.

How it goes

Field → LiDAR → design → machine

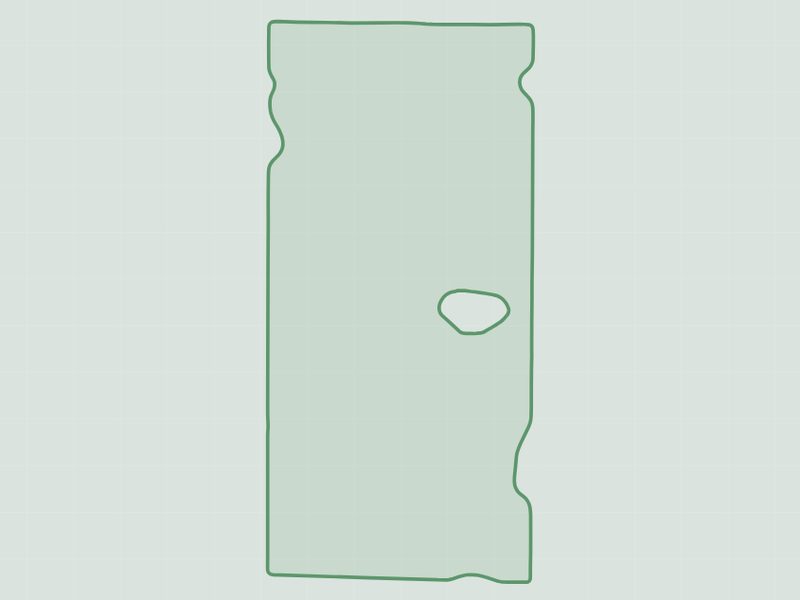
Field boundary
1 · Field Pick it from your field list or draw the line.
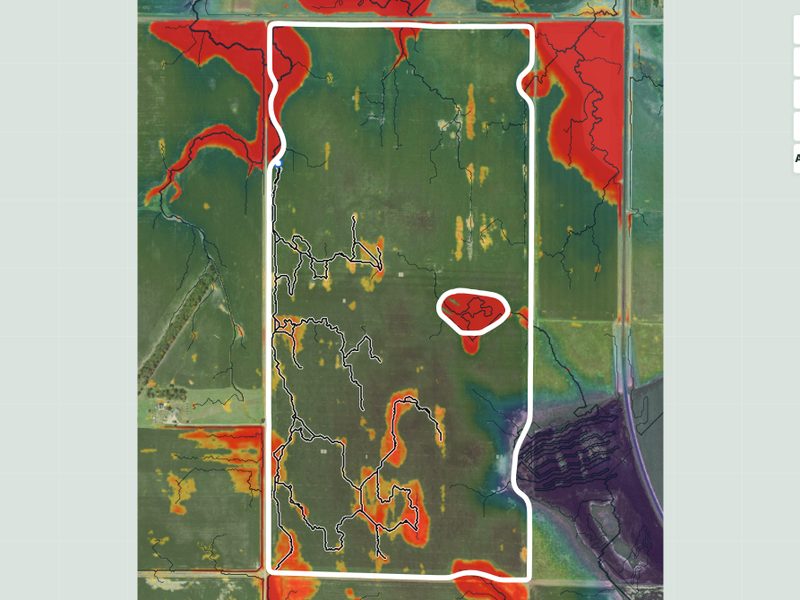
LiDAR drainage map with ponding and flow routes
2 · LiDAR Public elevation fetched, ponding and flow routes shown.
Finished ditch design on the photo
3 · Design Mark the outlet, press Create. Every run fitted to your limits.
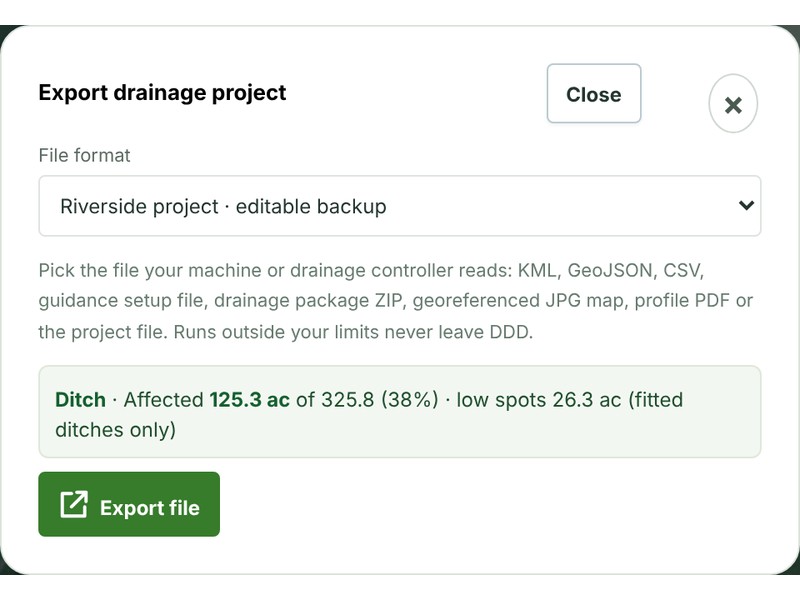
Export dialog
4 · Export Send the plan to your machine or drainage controller.

See it

Two workspaces, one field

Ditch and tile each have their own ribbon of tools, numbered in the order you use them. These are real screens.

A ditch network on a section: one main through the lows to the outlet on the east side and its feeders, every run fitted to a 3 ft maximum cut

Ditch

One main through the lows to your outlet, feeders from the flow routes, every run fitted to your grade and cut limits.
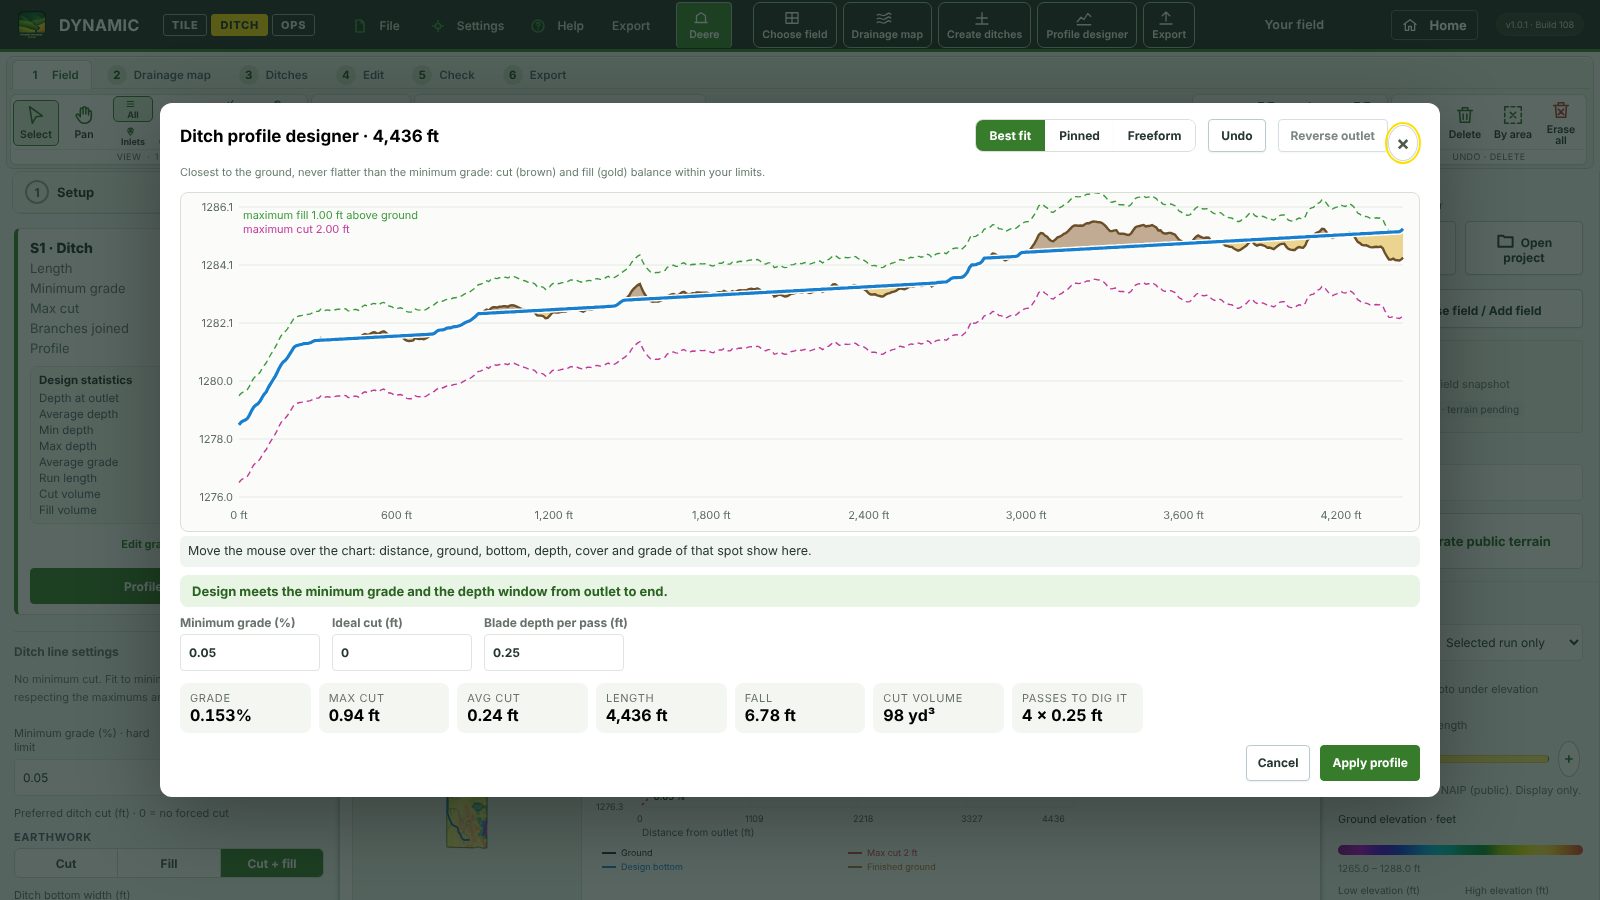
Profile designer with ground, design bottom, min and max depth lines

Profile

Best fit, pinned points or freeform bottom. Minimum grade is a hard floor; too deep is marked, never hidden.
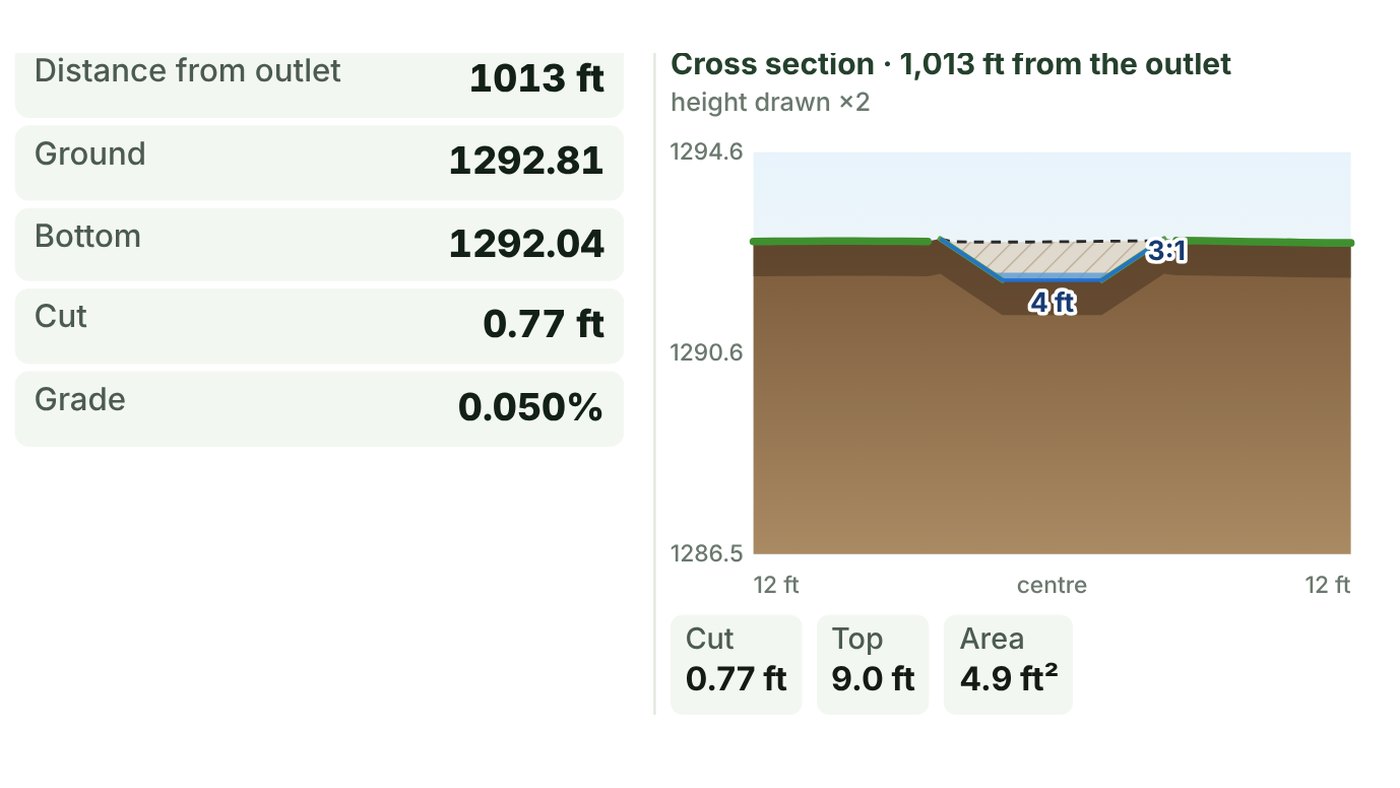
Ditch cross section beside the side profile readout: soil, topsoil and grass, the ditch with a 4 ft bottom and 3:1 sides, the cut shaded, with the cut, top width and cut area

Cross section

Click a ditch and see it as it will be dug: bottom width, side slopes to the ground and the cut, at the spot under your mouse on the profile.
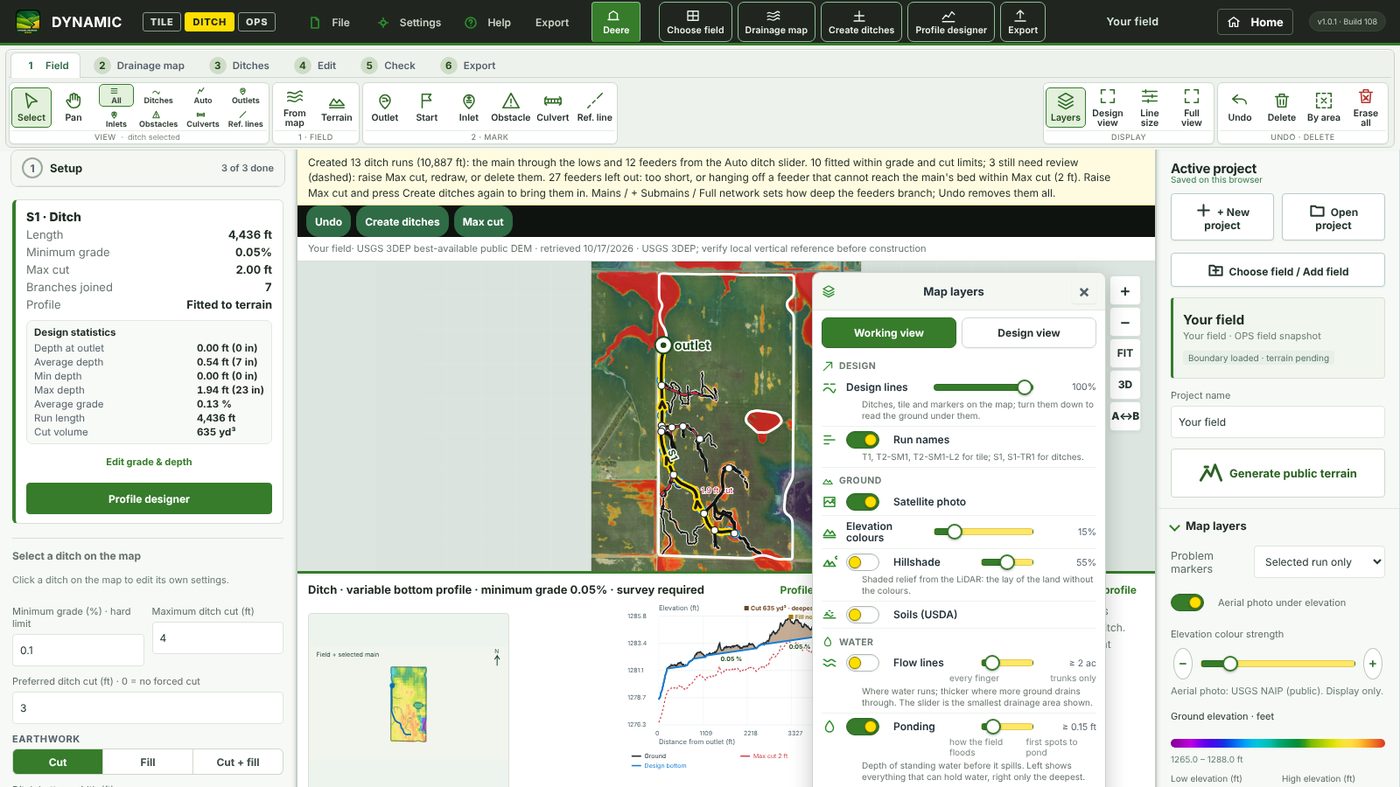
Map layers box over the map: design lines, photo, elevation, hillshade, soils, flow lines, ponding, wetness index

Map layers

Photo, elevation, hillshade, soils, yield, flow lines, ponding, wetness index: one box, a switch and a strength slider each.
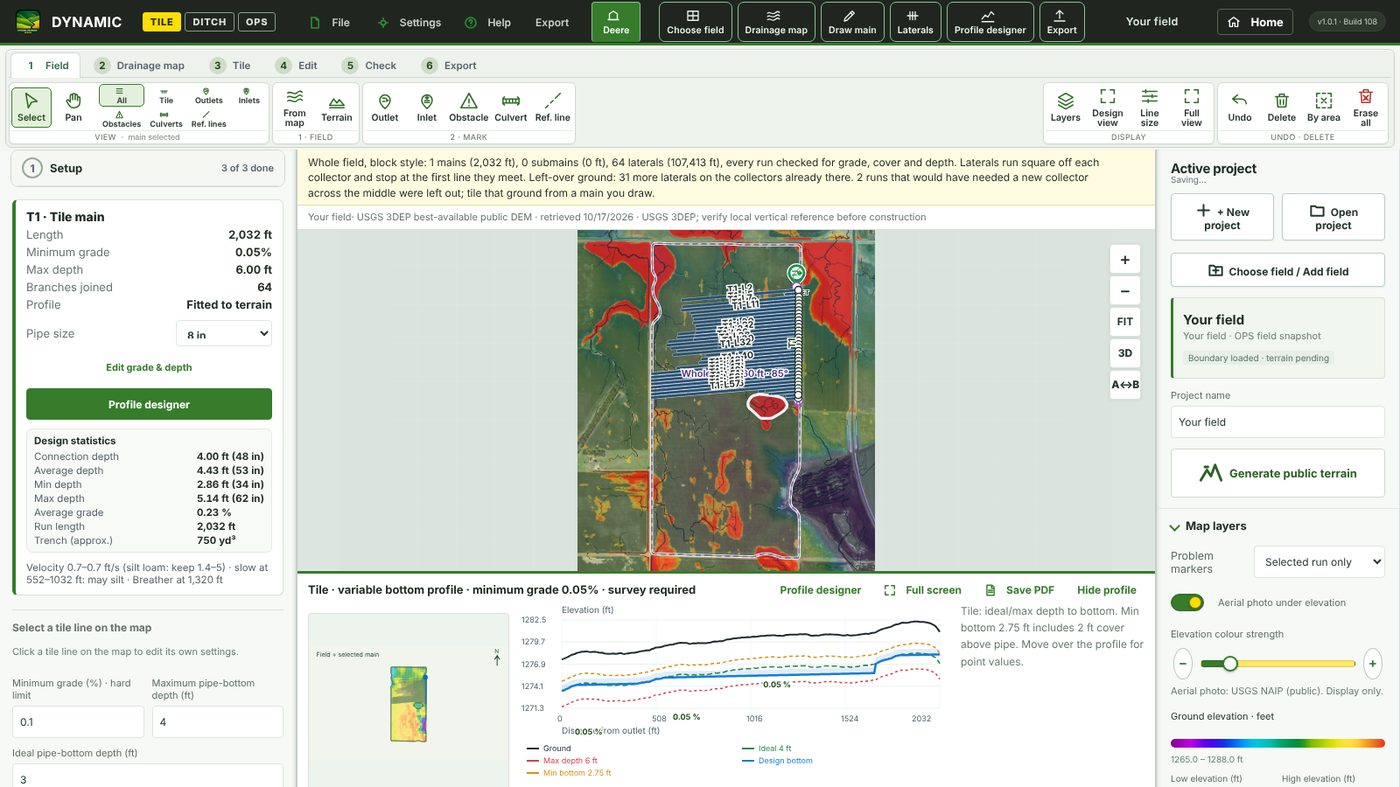
Tile main T1 selected with run statistics and the side profile

Named and checked

T1, T1-SM1, T1-SM1-L2. Statistics for the run, a grade label per stretch, a red band where a limit is missed.
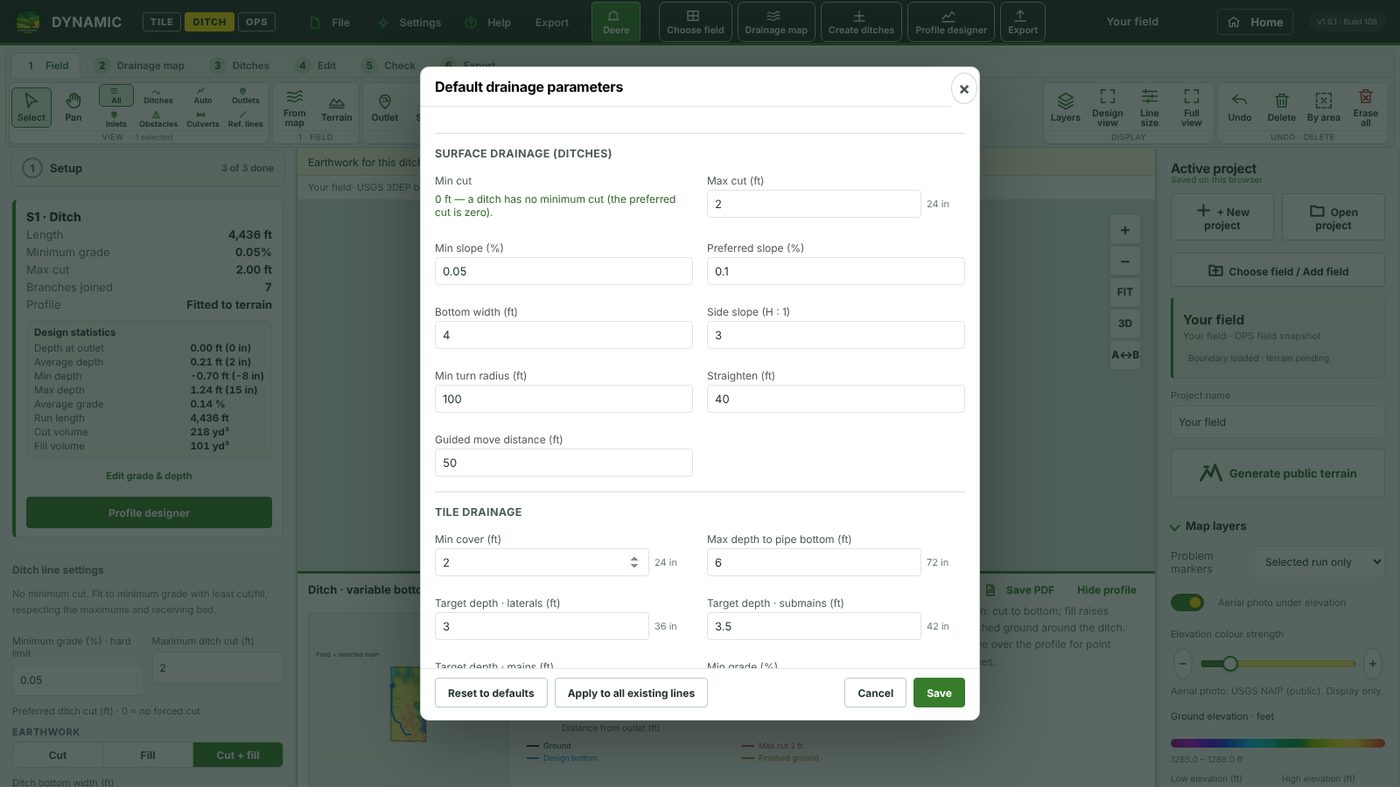
Default drainage parameters dialog

Your limits

Surface and tile defaults, pipe sizes and perforation, named profiles. Never lowered or raised by the program on its own.
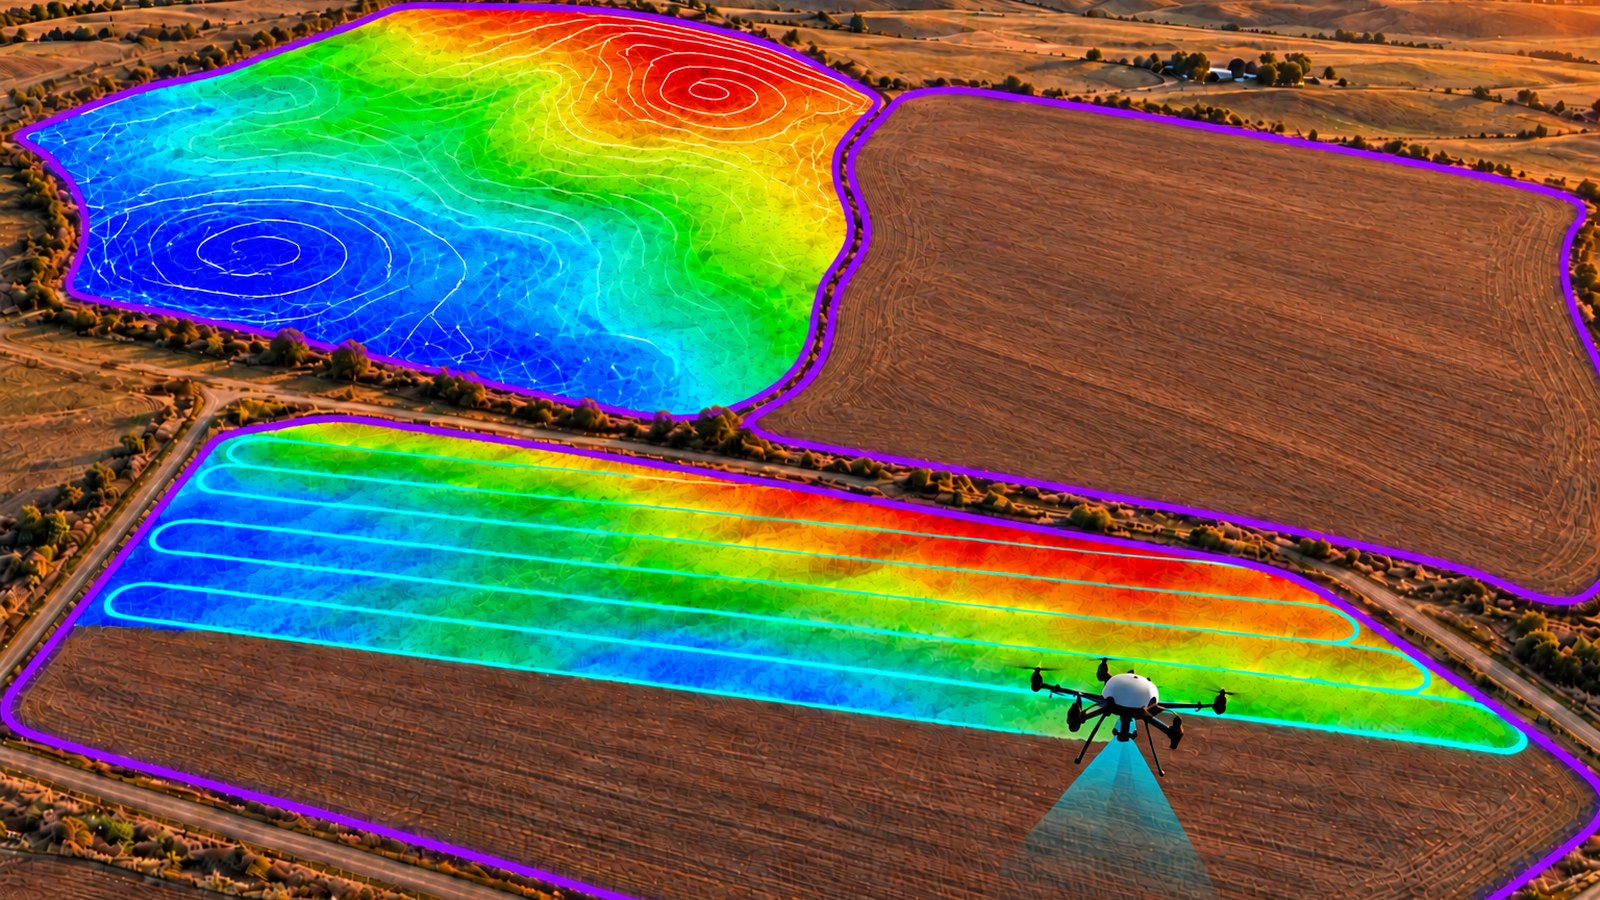
A drone flying its passes over a field, the LiDAR elevation map painted in behind it inside the field boundary; the finished field beside it fully mapped

Fly it yourself

Bring your own drone LiDAR map, or the elevation model your drone software makes. One pass at a time the field fills in; when the flight is done you design on it like on the public LiDAR, inside your field boundary.
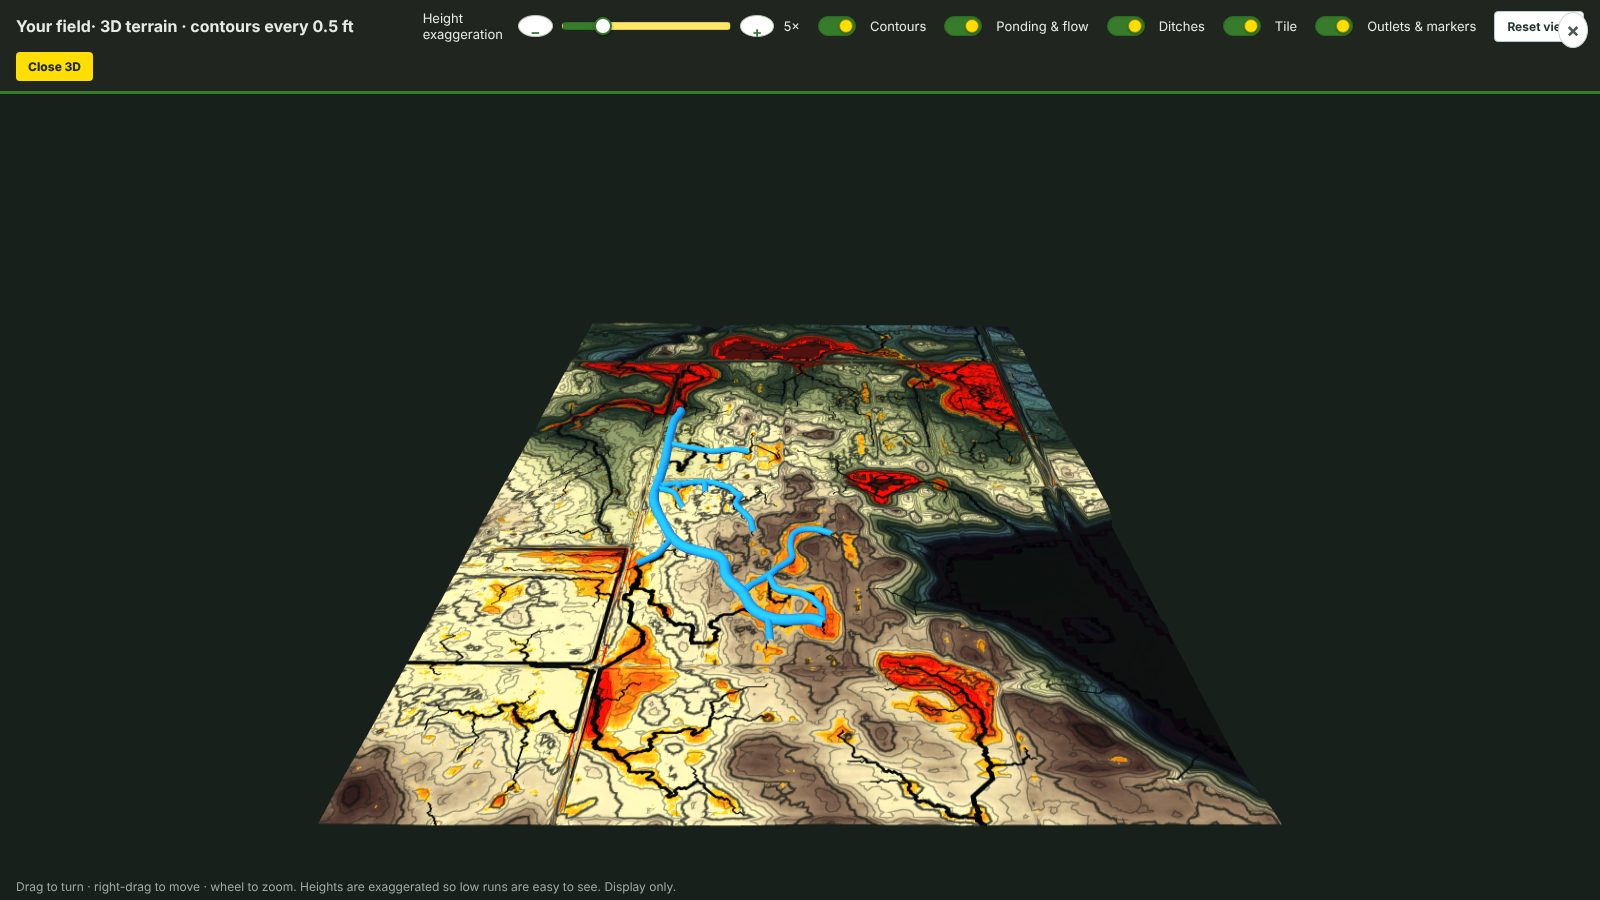
3D terrain view with contours, exaggerated heights and the design on top

3D

Turn the field in 3D with the ponding, the flow and every line on it, heights exaggerated so the low runs stand out.

Features

Everything between the LiDAR and the machine

One program, no spreadsheets, no files to shuttle between tools.

Drainage map

Flow routes, ponding, depressions

The LiDAR is pit-filled and routed. You see every trickle or only the main channels, the ponds at your cutoff, and the depressions by depth.

Ditch

Automatic ditches, smooth for auto-steer

Ditches follow the natural low line. Every bend is a true arc at your turn radius. Preferred cut zero, maximum one foot; anything deeper is a review item.

Ditch

Guided or exact drawing

Sketch a corridor and DDD finds the low route inside it, or keep the line exactly where you drew it. Click, drag, right-click to finish, like a CAD tool.

Tile

Mains up the draw, laterals in blocks

One system per marked outlet. Fill an area with long parallel laterals to the lowest line, each block in its own direction, with collectors to the outlet.

Tile

Depth to the pipe bottom, cover over the pipe

Laterals 3 ft, submains 3.5, mains 4, never over your maximum. A branch joins its main from above, the way a tee is cut in the field.

Tile

Pipe sizing the NRCS way

Drained width from the runs beside each lateral, every stretch of a main at its own grade, roughness by pipe size, always rounded up. The card says which stretch set the size.

Yield

Your yield maps, straight in

Import your yield maps from Operations Center (the yield ZIP or shapefile export) or any yield CSV. The wet spots show on the map as a layer with a strength slider and tell the design where the water sits, so the tile and ditches go where the yield says they are needed.

Layers

Overlays you already have

Public aerial photo, soils, contours, hillshade, coverage and your yield, each with its own switch and strength slider. Bring a picture or an old plan of the field too (JPG, PNG or BMP, with or without a world file, placed on the map), import lines from KML, GeoJSON, shapefile, CSV or a drainage package, and save the finished map back as a georeferenced JPG.

Checks

Ponding after ditches

Carve the ditch plan into the ground and rebuild the map: how many acres the ditches drain, and what is left for a tributary, an inlet or tile.

Report

Acres, yards, feet of pipe

Affected acres, cut and fill in cubic yards, a pipe schedule by size, overburden where a run must go deeper than the plow. Print it or save a PDF.

Machine

Straight to the machine

We design it; your drainage controller controls to it. Checked runs export as KML, GeoJSON, CSV, a guidance setup file for the display, a drainage package ZIP, a georeferenced JPG map, the profile PDF and the project file. Every major drainage controller reads one of these. Runs that fail a limit are never sent.

How it works

Three steps from the start screen to the display

Choose the field

Pick it from your field list or draw the outline on the map. DDD fetches the public LiDAR, or takes your own drone LiDAR flight, and builds the terrain and the drainage map.

Design

Mark the outlet, create the ditches or lay the tile, set the run length with the slider, fix anything the review list flags.

Send

Export in the file your drainage controller reads (KML, GeoJSON, CSV, guidance setup file, drainage package, JPG map, PDF), or send the lines straight to Operations Center as auto-steer guidance. Survey with RTK before you dig; the LiDAR plan is the start, not the survey.
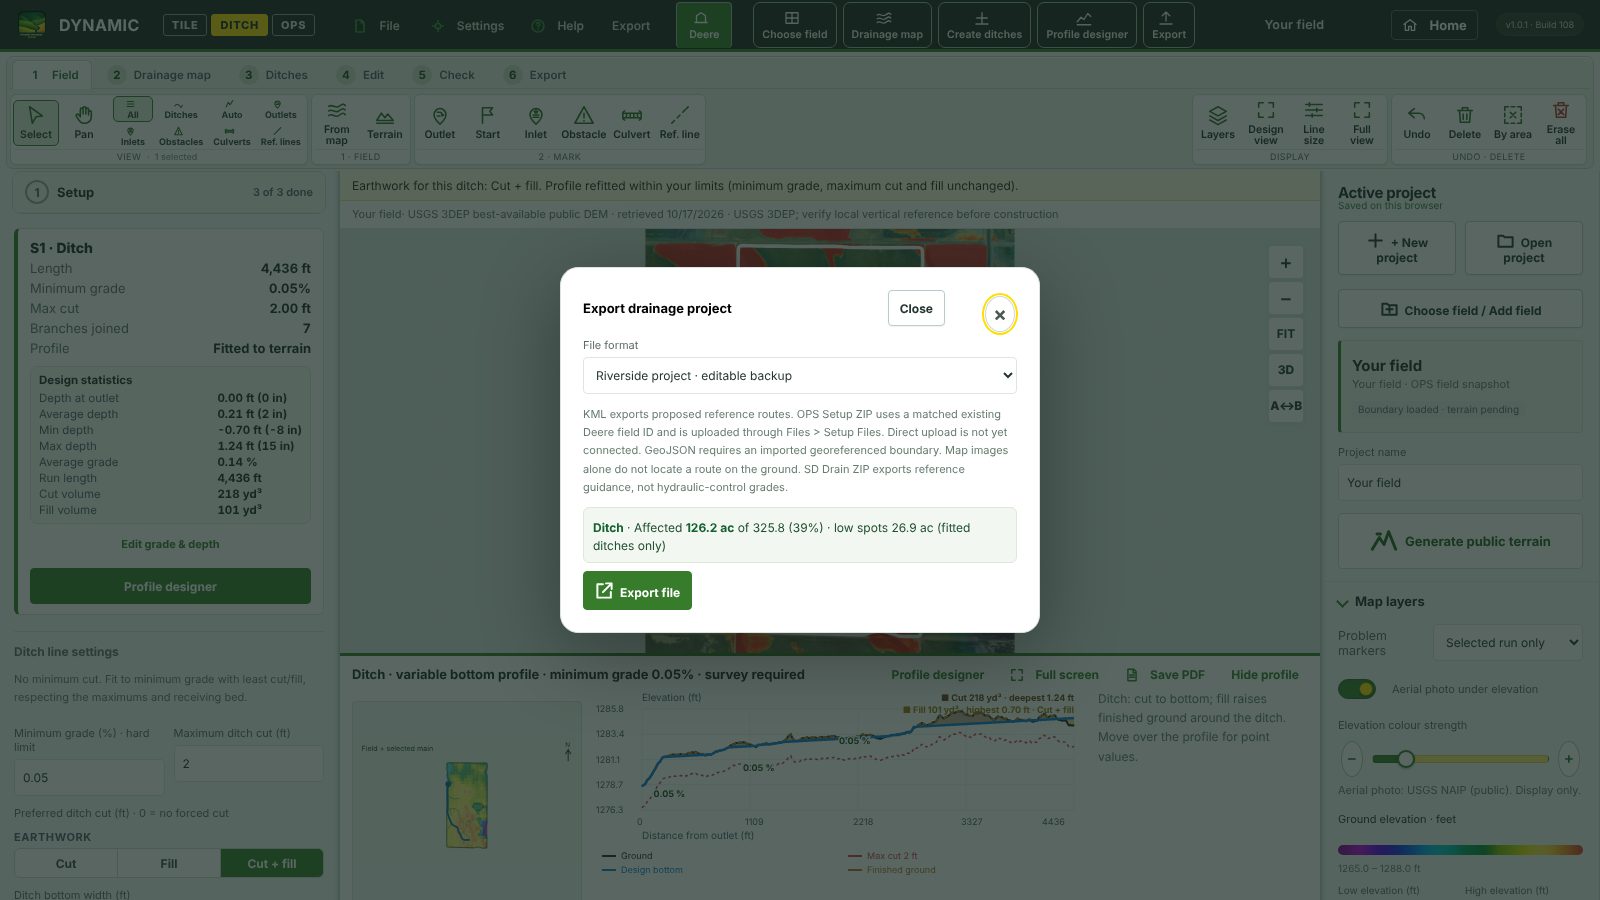
Export dialog in DDD: file format, affected acres and the Export file button
Export: project backup, KML, drainage package or guidance lines, with the affected acres and the review held back.
Ditch profile with cut and fill shading and the totals
Cut and fill on the profile, totals in yards, affected acres on the report.

Rules it never breaks

Built to keep the plan honest

  • The minimum grade is a hard floor. DDD never lowers it or raises a depth limit to make a plan fit.
  • A run that fails a limit stays on the map as a review item, dashed and marked, and is never exported.
  • Marked outlets govern. No invented culverts, no invented road crossings.
  • Your drawings are never regenerated over. Creating again replaces only what DDD made.
  • Your fields, yield maps and plans stay on your computer. Nothing is uploaded except the lines you choose to send to your machine.

Get DDD

Download, install, try it, buy it.

Current version 1.4.0 · fixes are numbered 1.2.2 and so on, new features 1.3, 1.4.

DDD runs installed on your Windows PC, the demo too. Nothing runs in the browser and there is no account to make.

Windows 10 / 11

One installer. Updates come from inside the program (Help → Check for update).
Download Dynamic Drainage DesignVersion 1.4.0 · Windows 10 / 11 · one setup fileComing soon

Download opens at launch. Tell us the county and the acres you drain and we let you know first.

Four steps

  1. Download. Press the button, type the password you were sent, and the setup file comes down on its own.
  2. Install. Click the setup file in your browser's downloads bar. It fetches the program and installs it, and puts Dynamic Drainage Design on your desktop.
  3. Try it. Open it. The demo starts by itself: 7 days, every tool, one export. No sign-in.
  4. Buy. Pick Line Transfer, Ditch or Tile. The licence key comes by e-mail; paste it once into Settings → Licence. After that the program needs no internet for the licence.

Keep it handy

Save DDD to your phone or desktop.

One tap puts the DDD icon on your home screen or desktop, so the site and your downloads open like an app.
DDD icon
How to add it

Works on iPhone, iPad, Android, Windows and Mac. It is a shortcut to this website, your downloads and news. The design program itself runs on Windows 10 / 11.

How to add it

  1. Open this page in Safari.
  2. Tap the Share button (the square with the arrow).
  3. Scroll down and tap Add to Home Screen, then Add.

What's new

What changed, in plain words.

Every numbered update is listed here. The same notes are in the program under Help → What's new.

1.4.0Pick the size and colour of every lineOctober 18, 2026
  • Measure: click a spot for its elevation and GPS position, click a second spot for the distance, the fall and the grade. Right-click clears it.
  • Click a ditch: a cross section shows beside the side profile, with the bottom width, side slopes and cut at the spot under the mouse.
  • Line size opens a menu with every line on the map, each with its own size and colour.
  • The line you drag while drawing is red instead of grey, or any colour you choose.
  • More room for the map: steps 1 to 7 are small green squares beside the tools, the icons are bigger, and Profile is step 7.
  • Ditch shows only ditch settings and Tile only tile settings. A Parameters button sits in the Display box.
  • A bigger side profile with easier-to-read numbers.
  • Close buttons are a plain X in the corner.
  • In the demo after its one export, and for lines your licence doesn't cover, every export button is greyed out and no file leaves the program.
  • Check for update is one button; Install appears when a new version is found. No token needed.
  • Outlets find where the water leaves the field (from 1.3.3).
1.3.3Outlets find where the water leavesOctober 18, 2026
  • Click an outlet near the field edge and it moves to the spot where the water actually crosses the edge, so the ditch network comes out the same wherever you click along that stretch.
  • Update makes the ditches when there are none yet, like Create ditches.
1.3.2One round look for every switchOctober 18, 2026
  • Every on/off switch in the program now has the same round look.
1.3.1Top bar answers every click; does the design carry the waterOctober 18, 2026
  • Choose field, Drainage map, Draw main, Laterals, Create ditches, Profile designer and Export in the top bar respond to every click again.
  • The outline around the last top-bar button is drawn in full.
  • New check: every ditch and tile main is compared with the water that reaches it. Click a run to see OK or TOO SMALL; the printed report lists them all, and the design storm names the spots still wet at the end.
1.3.0Licence tied to your computer, one-file setupOctober 18, 2026
  • Settings → Licence → Activate ties your key to this computer in one step over the internet; after that the licence works offline. A key covers two computers; Remove from this PC frees a place.
  • The program runs installed on your PC only. One setup file from the download page fetches and installs everything.
  • Help answers the licence questions: two computers, moving a key, what happens if someone copies the files.
1.2.1Help menu: questions, answers and troubleshootingOctober 18, 2026
  • Help → Questions & answers: everyday questions with plain answers and a search box, from getting started to export.
  • Help → Troubleshooting: the common problems and what to do, the same list as the manual.
  • The manual's Export chapter says it plainly: DDD designs it, your drainage controller controls to it, and an RTK survey before installation is recommended.
1.2.0Bring your own drone LiDAROctober 18, 2026
  • Import your drone LiDAR flight (LAS or LAZ point cloud, or its elevation model) and design on it like on the public LiDAR.
  • Where the ground was already classified it is used as is; otherwise the program takes the lowest return in each cell and removes the crop and bushes.
  • WGS 84 / UTM is what drone software writes and what the program reads; other projections get a plain message saying what to set.
1.1.1Steady on phones, Line Transfer on the start screenOctober 18, 2026
  • On a phone the toolbar no longer flickers between two layouts.
  • The start screen's third choice is now Line Transfer, the same name as the licence: import and export lines for your drainage controller, KML and the display.
  • On a phone the three start choices fit on one screen; the odd strip down the right edge of the start screen is gone.
  • Step 6 · Export has its own tools again: Profile PDF, Picture and Line Transfer.
  • On a 1366-pixel laptop every top-bar button shows in the tile workspace, and the field name is readable.
  • The field card now says when the LiDAR terrain is loaded.
1.1.07-day demo and licencesOctober 18, 2026
  • A new copy runs as a 7-day demo: every ditch and tile tool on every field, and one export to take a design all the way. After that one export nothing more leaves the program; after 7 days the program asks for a licence key.
  • Line Transfer imports and exports lines and sends them to your machine. Ditch adds every export of your ditch designs, Tile every export of your tile designs; both include Line Transfer. Ditch and Tile together is everything.
  • A licence key is typed once (Settings → Licence…) and checked on your computer. In the browser version your demo days and licence stay with your sign-in.
  • What your licence doesn't cover stays on screen, greyed with a lock and the licence that opens it.
1.0.1Small fixes after the first day on v1.0October 17, 2026
  • The Straighten setting for clean ditch lines is now also in Settings → Drainage parameters, next to the minimum turn radius.
  • The parameters dialog no longer reports the pipe sizes as changed when you only pressed Save.
  • The new icon with the name on it is used by the program, the installer, the manual and the website.
1.0.0First numbered release: clean lines, honest fits, Design viewOctober 17, 2026
  • Clean ditch lines. Every automatic ditch is now one smooth line instead of following the water route wiggle by wiggle. A new Straighten setting (default 40 ft) decides how much small bend is dropped; the bends that matter stay, and every corner is rounded for auto-steer. A run keeps its exact route where the straighter line would no longer fit your cut limit.
  • The receiver governs. A main that starts at a marked outlet is tied to that outlet and its bottom is never fitted below the receiving ditch bed. If the receiver is too high for the lows, the run stays a red review run and says so.
  • Routes respect your restrictions. The start-to-outlet route search stays inside the field and inside a drawn design limit, and keeps clear of obstacle marks.
  • Ponding after ditches shows only what fits. The simulation carves only ditches that pass the grade and cut limits, and tells you how many review runs it left out.
  • Design view. One tap shows the photo, the field line and the finished runs with their names, nothing else. Working view brings every layer back the way you had it.
  • Map layers box with a picture for every layer, named runs on the map (S1, S1-TR1, T2-SM1-L2), design statistics on the selected run, grade labels on the profile, ground elevation under the mouse, a cost estimate box on the report, and colour-coded sliders.
  • Guidance lines for the display without waiting on anyone: the setup-file route and the saved yield export need no approval. The live link stays optional.
Preview builds 48 to 103Everything that came before the first numbered release2025 to October 2026
  • Ditch design from public LiDAR: drainage map, flow routes, ponding, one main through the lows with feeders from the Auto ditch slider, Mains / Submains / Full network, cut and fill profiles, ideal and maximum cut.
  • Tile design: whole-field layouts with mains first, then submains, then laterals; mirrored laterals; depth to the pipe bottom with cover over the real pipe; pipe sizing checks; velocity, breather and relief-well advice.
  • Drawing tools: exact and guided lines, trim, split, extend, join, move, smoothing to a minimum turn radius, no sharp corners anywhere.
  • Checks before anything leaves the program: a run that misses its limits, has a corner over 6 degrees, or drains into such a run is held back and never exported.
  • Machine link: field import, guidance as a setup file, yield maps as evidence for wet spots.
  • A Windows desktop program that updates itself, an operator manual that is rebuilt with every build, and soils, aerial photo, hillshade and wetness layers for context.

Pricing

Try it for 7 days. License what goes to the machine.

The demo has every tool and one export. After that, a licence lets the plan leave DDD: files, pictures, PDFs and guidance lines for your machine.

Demo

7 days
free, from the first start
  • Every ditch and tile tool, every field
  • Drainage map, 3D, profiles, reports
  • One export to try the whole way
  • Then a licence key keeps it going
Download
Line Transfer
coming soon
  • Import lines: KML, GeoJSON, SHP, CSV, drainage packages
  • Round them for auto-steer
  • Export any file: KML, GeoJSON, CSV, guidance setup file, drainage package
  • No ditch or tile design exports
Get it
Tile
coming soon
  • Line Transfer included
  • Every export of your tile designs
  • Mains, submains and laterals with grades
  • Ditch + Tile together: everything
Get it

Prices coming soon (US dollars). A licence key is typed once into the program and checked on your computer. The demo and the licence live in the installed program; after the key is in, DDD needs no internet.

FAQ

Straight answers

What do I need to run it?

A Windows 10 or 11 PC. DDD installs from one file and runs on its own: no other program, no server, no account. Internet is used to fetch the public LiDAR and updates; the licence key is checked on your PC, so a licensed DDD works offline.

Where does the elevation come from?

Public USGS 3DEP LiDAR, 1 m where it exists. Design on it, then survey with RTK when the job goes ahead. DDD says so on every design.

Can I use my own drone LiDAR?

Yes. Import the flight as a LAS or LAZ point cloud, or the elevation model (GeoTIFF) your drone software makes, exported in WGS 84 / UTM. Ground points already classified are used as they are; otherwise DDD picks the ground itself and removes the crop and bushes.

Does it work with my machine?

Yes. DDD writes KML, GeoJSON, CSV, a guidance setup file for the display, a drainage package ZIP, a georeferenced JPG map, the profile PDF and its own project file. Every major drainage controller and display reads one of these. Lines you already have come in the same way, get rounded for auto-steer and go back out.

Does DDD upload my fields or plans?

No. Fields, LiDAR, yield and plans are read and kept on your computer. Only the lines you choose to export leave the program.

How does the machine follow the depth and grade?

DDD designs it; you control to it. The export carries the line and the designed bottom: grade of every stretch, depth at every point, pipe size. Your drainage controller on an RTK receiver loads the line and runs the grade as the plough or scraper works; all the major controllers read one of the files DDD writes. An RTK survey of the route before installation is recommended.

Can it design installation grades?

It designs the plan: routes, bottoms and pipe sizes within your limits, as the start for the RTK survey and the installation. It never claims a plan is installation ready.

How do updates work?

Help → Check for update in the program. It fetches the new build, shows what changed, and installs when you say so.

Try it on your own field

Design your first field with DDD

Download it, install it, and the 7-day demo starts on its own.

Download Dynamic Drainage DesignComing soon